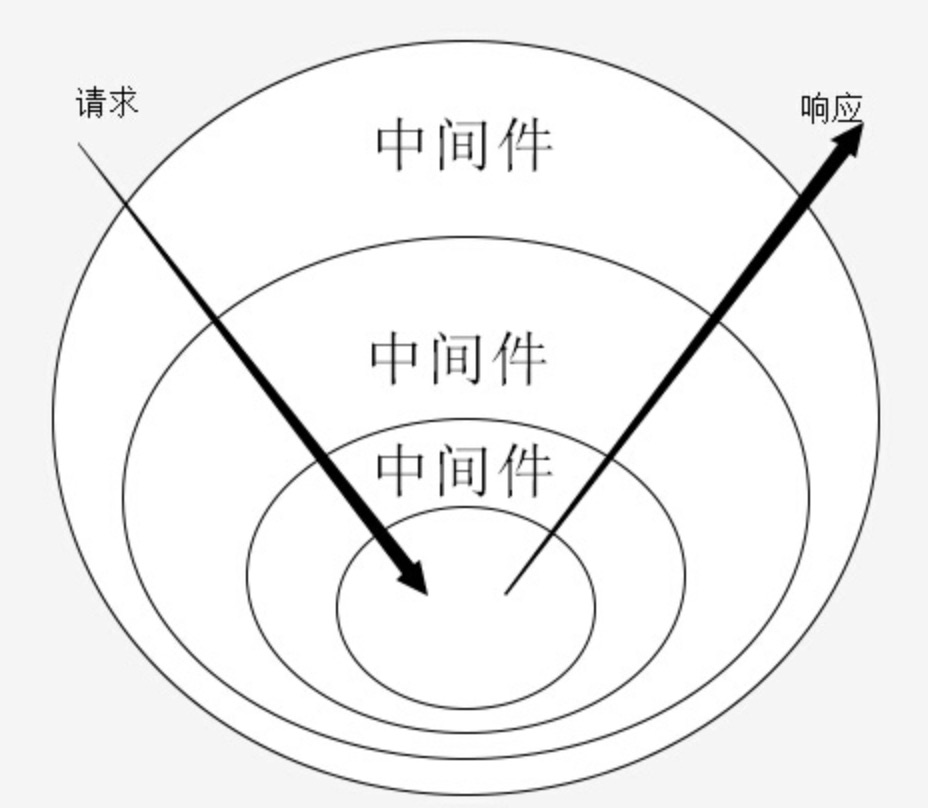
中间件
用过express或者koa的开发者,对中间件肯定是耳熟能详的。其中koa的中间件因为采用洋葱模型
而广受业界好评,受此熏陶,aomex亦采用与koa同样的中间件逻辑
第一个中间件
记住,aomex是一个对TypeScript类型有执念的框架,我们不允许写代码没有提示,所以接下来让我们牛刀小试:
import { middleware } from '@aomex/core';
export const firstMiddleware = middleware.pure(async (ctx, next) => {
console.log('enter');
await next();
console.log('exit');
});
// PureMiddleware<object>
console.log(firstMiddleware);
很显然,ctx
和next
都是已经处于有类型的变量,你在回调函数中可以愉快地写着业务逻辑。如果此时你想带些成果给外部使用呢?我们可以这么干
import { middleware } from '@aomex/core';
export interface FirstMiddlewareProps {
result: string;
remark(newValue: string): void;
}
export const firstMiddleware = middleware.pure<FirstMiddlewareProps>(
async (ctx, next) => {
let result = 'final result';
ctx.result = result;
ctx.remark = (newValue) => {
result = newValue;
};
await next();
console.log(result);
},
);
// PureMiddleware<FirstMiddlewareProps>
console.log(firstMiddleware);
我们发现中间件泛型上填充了一个自定义的接口类型,这是专门为外部环境准备的。当我们讲到应用环节时,它的威力才会被真正地展示出来。但是我们不妨提前透露一下
import { middleware } from '@aomex/core';
import { Router } from '@aomex/router';
import { firstMiddleware } from '../middleware/pure.middleware'
export const router = new Router();
router.get('/api', {
mount: [
firstMiddleware
],
async action: (ctx) => {
ctx.result; // string
ctx.remark; // (newValue: string): void
ctx.whatever; // 类型报错!它不属于这里
},
});
嗯!控制器内十分精准的类型提示,兴奋的飞起吧。这种智能提示
的设计思路贯穿了整个框架。
感谢微软和它开源的的TypeScript语言
执行顺序
正如开头看到的那张图,中间件遵循洋葱模型,从左边往右依次执行,接着从右往左反向执行。
import { compose } from '@aomex/core';
const a = middleware.pure(async (ctx, next) => {
console.log(1);
await next();
console.log(2);
});
const b = middleware.pure(async (ctx, next) => {
console.log(3);
await next();
console.log(4);
});
const c = middleware.pure(async (ctx, next) => {
console.log(5);
await next();
console.log(6);
});
// 执行中间件
const context = {};
compose([a, b, c])(context);
能猜出日志输出顺序吗?我就不卖关子了:1 3 5 6 4 2。
细心的朋友已经发现await next()
这一行了,它的作用其实就是在等后面的中间件全部执行完,然后再执行当前中间件剩下的逻辑(洋葱的右半部分)。而且注意一定要加上await
关键词,否则next后面的逻辑会立即执行。
链条
中间件使用方式就是挂载到应用入口或者路由上的,但是对于TS项目有一个致命缺陷,就是挂载到应用入口的中间件,路由逻辑无法静态探测。
const app = new App();
+app.mount(middlewareA); // PureMiddleware<{ data1: string }>
const router = new Router();
router.get('/api', {
- mount: [middlewareA],
action(ctx) {
+ ctx.data1; // 类型报错!
},
});
app.mount(router);
为了彻底解决这个问题,aomex另辟蹊径,设计出链条的概念。链条的本质就是中间件容器
,你可以把它想象成一条真正的锁链,每个铁环上都挂着一个物件。
import { chain } from '@aomex/core';
const a: PureMiddleware<{ data1: string }>;
const b: PureMiddleware<{ data2: number }>;
const c: PureMiddleware<{ data3: boolean }>;
// 包含中间件:a,b
const appChain = chain.pure.mount(a).mount(b);
// 包含中间件:a,b,c
const businessChain = appChain.mount(c);
// ------------------------------- //
const app = new App();
app.mount(appChain);
const router = new Router();
router.get('/api', {
mount: [businessChain],
action(ctx) {
ctx.data1; // string
ctx.data2; // number
ctx.data3; // boolean
},
});
app.mount(router);
完美提示!! 注意看,在创建链条时,我们创建了两个变量appChain
和businessChain
,接着appChain被挂载到了应用入口,而businessChain被挂载到了路由。现在我们看看这里包含的3个中间件分别是怎么分配的:
- a -> 全局中间件
- b -> 全局中间件
- c -> 路由中间件
怎么做到的?其实appChain
和businessChain
是拥有相同根节点的链条,前者是后者的子集。当链条的一部分被挂载到app上时,这部分的尾巴就会被打上一个标识位(flag)
,而标识位后面部分的链条,才真正属于路由。
入口 标识位 路由
╭─────┴────╮ ↓ ╭───────────┴───────────╮
a --------> b --------> c --------> d --------> e
╰─────┬────╯
appChain
╰──────────────────────┬───────────────────────╯
routerChain